How to Drive 300K+ Traffic to Your Blog with Pinterest…
“A jack of all trades is a master of none.” We’re talking Pinterest traffic here folks, not Insta, FB, or any other social media! If you are looking to learn how to drive traffic to your blog with Pinterest, you have come to the right place!
If there is one lesson to imprint in your mind when it comes to getting blog traffic, this is it…
There are dozens of legitimate ways to generate traffic to a website, including:
– Pinterest
– Facebook
– Google SEO
– Youtube
– Instagram
– Guest Blogging
– Email Drops
– Forums
– Etc.
When you’re starting out, there will be MASSIVE internal temptation to want to do everything.
And this, my fellow bloggers, is a mistake.
In fact, it’s why the majority of traffic blogs out there don’t ever really help people. They tell beginners to try to do everything.
If you’re optimized for everything, you might as well be optimized for nothing.
In other words, having an optimized page for getting a post repinned is completely different from optimizing a page to get Google Searched.
Don’t be a jack of all trades.
Or take the good advice of Red Foreman of that 70’s Show:
“Don’t half ass everything. Whole ass one thing.”
Which traffic source should I choose?
![]()
We can’t decide that for you, but we personally like Pinterest for a variety of reasons…
– Our traffic is FREE.
– Virality potential is freaking nuts (had one single pin drive over 80k views in a DAY).
– The demographic is high income earning people (avg. around 70k per year).
– It’s fun!
– Pins can stay searchable over time (evergreen traffic), meaning steady and consistent traffic.
– It can be 100% automated with a scheduler.
– The most profitable target markets are on Pinterest.
Because Lauren and I are experts in Pinterest, that is what we are going to talk about in this article.
There are plenty of good resources out there for other traffic models, but I will encourage you one last time to MASTER ONE.
Don’t just play around with one traffic source. DOMINATE IT!
The only other real thought to consider is where your target market is located.
If your market is located on Pinterest, it’s the traffic source I would go with. If you’re running something that people don’t search for, like medical conditions or a blog mainly for men, then another source may be better.
Here are some markets that are HIGHLY successful on Pinterest:
– Recipes
– Health and Fitness (almost any niche)
– Survival (Yes it’s mainly for guys, but we know of a blog generating over 5 million dollars per month from Pinterest)
– Blogging
– Making Money from Home
– DIY
– Fashion
– Arts
– Parenting
– Cars and Motorcycles
– Hair and Beauty
– And many others!
Some thoughts about the Almighty Facebook:
Every marketer loves Facebook, but I have quite a few reasons for not paying it any attention these days…
– Reach is incredibly low. Like 10%-20% of people will see your organic posts (and this will continue to drop).
– It’s cluttered. Your posts will be competing with videos and funny memes. Good luck getting me to click on your post when it’s between a pug video and a buzzfeed article.
– Building it organically is incredibly SLOW.
– Because of the above, getting traffic and visitor takes serious ad dollars.
– Even when you spend money on ads, people stop responding to them over time. This means a never ending cycle of creating new ads and spending ad dollars. This means more time spent on being an ad expert and less time on being a creator.
– The demographic is all over the place, but it’s also quite popular amongst low income earners.
– It’s kind of lame to be honest.
Listen, there are plenty of people who make Facebook work, but personally I don’t think you should waste your time unless you are very familiar with it and love spending time on it. Or unless you have cash money to shell out on ads.
The only thing we use Facebook for is private groups and creating communities. It’s actually GREAT for this. Join our free group and see for yourself: Honest Bloggers
Anyway, it’s not great for traffic. Alright, let’s move onto the meat and potatoes of this article…
For all of you preferred video learners out there, here is a quick video on this topic from our YouTube Channel, Blog and Go, below.
Step 1. Create an account.
You can create an account by going to the Pinterest homepage. You can sign up with Facebook or an email address. Note that you cannot sign up with a Facebook business page, because business pages are attached your personal account.
So you must connect your personal profile to Pinterest if you want to sign up with Facebook.
Pinterest will then prompt you to follow a few “topics” or “categories.” Go ahead and find the topics that apply to your business, and follow them.
I strongly encourage you to only follow topics that relate to your business. Keep your personal interest for fashion, photography, etc. on your personal Pinterest account (unless that IS your business industry of course).
Following these topics will help pinterest populate your “home feed,” which is like the “news feed” on Facebook. It’s where you can see all of the content from the people that you follow.
Step 2. Fill out your profile and verify your website.
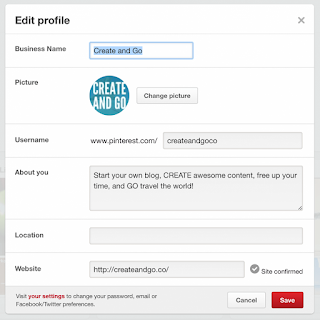
Here is what the edit profile screen looks like:

Start by adding your business name (this can be changed at any time) and your Pinterest URL. You may need to be crafty with this one, because the URL may already be taken by someone else.
The “about you” section should include a short description of who you are or what you do. Try to add important searchable keywords in there when you can as well (ex: ‘start a blog’ and ‘travel’ are in ours).
The location is optional.
Verify Your Website
You must verify your website on Pinterest for them to be able to recognize your blog and your posts that you pin. When you type in your website URL, click the confirm button (ours is already confirmed, so there is no button to display).
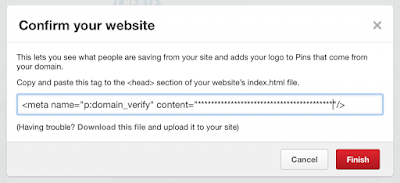
You will then get a pop-up with some information to confirm that looks like this:

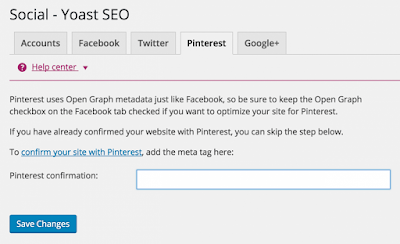
So for this next step, you either have to know coding, pay someone that knows coding, or use a plugin. The plugin, called Yoast SEO, is free and will help you out with Rich Pins (next step) as well.
Now you can either copy the entire meta tag from Pinterest and add it to the box or copy just the numbers and letters in the quotations (ours are ******* to protect our website).
Either one will work, because it only saves the numbers and letters. Make sure to save your changes.
Now return to Pinterest and click the “Finish” button. It should say that your site has been confirmed. Save profile changes.
You may need to click out of your profile settings and go back into them for the “Site confirmed” with the checkmark to show up.
Step 3. Apply for rich pins.
One of the most important first steps in how to drive traffic to your blog with Pinterest is setting up rich pins.
This is how Pinterest recognizes your blog posts on Pinterest. In a sense, Pinterest likes that it can recognize you and trust you. This helps boost your pin reach and engagement.
Unfortunately, the process can get a little complicated, because you have to equip your website with meta tags to do this. Unless you are a coder, and we are assuming that you are not, you will need to pay something to do this or use a plugin.
If you ARE interested in reading the nitty gritty, it can be found on Pinterest’s website here.
Some WordPress themes allow you to add the tags in your settings, but most do not. Thankfully, this can also be done with the Yoast SEO plugin.
You’ll want to be in the same “Social” section as described above. Click the Facebook tab, and make sure Open Graph meta data is enabled. Your screen should look like this:
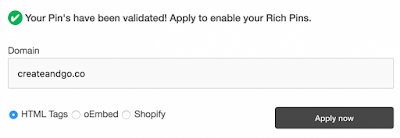
Next, you will need to validate the website on Pinterest. You can do so by going to the Rich Pins Validator and pasting a URL from any post on your blog into the validator.
After applying, you should see “Thank You” notification from Pinterest telling you that they will review your account and let you know via email.
Pinterest should let you know within 24 hours if you are approved or not! They will email you with a stated approval or explain why you were not approved.
Step 4. Create boards.
Fill out the name of the board first, and TRY to avoid getting cutesy with it! In order for your boards to be found by others on Pinterest, they must be searchable.
So when I want to find information on how to lose weight in a week, I am going to type “lose weight in a week” into the Pinterest search bar. THAT should be your board title.
Make sure your board titles AND descriptions are optimized for search. Try to use keywords that people will commonly search for. This is called “search engine optimization”.
Bonus tip on board covers:
Note that when you add your first pin to a board, Pinterest will automatically crop the top of that pin and make it the board cover. You must add at least 2 pins to a board before you are able to change the cover. Find a great looking pin, and select that as the board cover in the “edit board” settings.
You can also make your own covers using Canva. Here is an example of mine below when we first started the account:
As you can see, I created the 2nd and 4th covers in this row. The other two were cropped from other people’s pins. I use the size 217 (width) x 147 (height) pixels in Canva for creating covers.
Step 5. Build your account with your pins and the pins of others.
Run a search for the type of pins that you want on your board. For example, if it’s a “Weight Loss” board, search for “weight loss” pins.
When you find one, click the pin to follow the link through to the person’s website/article. This is just to make sure that A) it’s a good website/article and B) it’s not spam or blocked.
Pinterest doesn’t like when you repin spam or blocked websites, and they will penalize your engagement for it.
Then select the board that you want to pin it on! It’s important to have a mix of your own content as well as that of others to give your followers a variety of content and to show Pinterest that you are a team player.
This mix will change over time. In the beginning, you should mostly pinning the content of others. As you create more blog posts, you will slowly begin pinning most of your own content.
Step 6. Follow the top players in your niche.
When you’re looking to drive traffic to your blog with Pinterest, look to the top players in your niche.
As you begin pinning other blogger’s content, Pinterest will show a pop-up button at the bottom of the screen with an option to follow that person. Start clicking on people’s profiles and check them out.
If they pin great looking pins, follow them.
You want to follow the top players in your niche so that you can monitor their accounts, pins, and growth.
You want to get on their level, right!?
Following people will also generate pins in your home feed, and this will give you extra content to pin to your boards without having to search for it.
Note that when you are on someone’s profile, you will likely want to only follow specific boards that relate to your niche or industry. If you choose to follow their entire profile, you will be following ALL of their boards (including their cutesy Thanksgiving and Valentine’s Day boards, in which the content does NOT apply to you and will only clutter up your home feed).
Bonus tip for getting your first Pinterest followers:
Connect your Pinterest account to Facebook if you haven’t already. You can get your friends to follow your account so that you aren’t sitting at zero.
If you already have an established website, email list, or other social media account, share your Pinterest account on one or all of those platforms to get your first followers in the door!
Step 7. Create your first post and your first pin!
When you create a new post, remember to keep the title in mind as something that your readers are likely to search for on Pinterest.
If you already have a website with posts to put on Pinterest, then you can start at making your first pin.
By far the best tool for creating pins is Canva. It’s a free (they have a paid version, but I have never seen the need for it) web designer application that allows you to create all sorts of images, including pins.
Note that you can pin anything to Pinterest of almost any size, but there is of course a range of sizes that will help you get the most reach and engagement on Pinterest.
The absolute smallest you should go for is: 735 px (width) x 1102 px (height). The largest is: 735 px (width) x 2000 px (height). Anything smaller or larger than this, and you are doing more harm than good. I find that right in between those two is usually the best for creating pins and having them seen (around 735 x 1500 px).
So in Canva, at the top right of the screen, you will see a “custom dimensions” button. Insert your dimensions there.
By active, we mean PINNING. The more you pin, the better chance your content gets seen.
In the beginning, start with 10-15 pins per day.
As you create more content and Pinterest begins to start showing some love to your pins, you can shift this balance to pinning more of your own content.
When you have a couple hundred followers or less, your content will be seen by a very small number of people. As your account grows, so does your reach and engagement.
It also matters what time of day that you pin. If most of your followers are in the United States and are active in the evenings, then you should mostly pin in the evenings.
This is especially important in the beginning, because it allows you to “share followers” from someone else’s board. It’s INVALUABLE at the beginning when you have under 1,000 followers and are struggling with getting your pins seen.
You can also sort them by followers, collaborators, repins, and more.
Make sure that the board has MORE Pinterest followers than your account does, or you are just wasting your time (unless the board has very good engagement – you will need a Tailwind account to see board scores and engagement). You can sign up for a free 14-day free trial.
When you find a board that you like, first follow it, and then you will need to contact the owner.
If they have an email address in the description of their board, that is your best option. You can also look to see if their profile is connected to a website and look for contact info on their website.
The other option (and what most people say to do in their board descriptions) is to “comment on a pin” with a request to join. This is less than ideal, because many people won’t notice your comment in their notifications. It’s worth a try though, and it does work sometimes.
Find their last pin on that board (or their account) and comment with a polite request to join. Make sure you write the email address that is tied to your account in the comment so that they don’t have to find you to add you.
Remember that joining a “bad” group board (aka poor engagement) is worse than joining no group boards.
See this article for more discussion about how to determine whether group boards are performing well and worth your time.
Bonus tip on joining group boards:
Make sure your account is in good shape before you begin requesting. Board owners (the good ones anyway) will usually look over your profile to judge whether your content is good enough to be on their boards.
Make sure you check your links and only post great content!


